- Download the libjtag_hw_mbftdi-blaster.so file, which is attached at the end. Move the file to the
~/altera_lite/20.0/quartus/linux64
folder (20.0 means the Quartus version, modify it with your own Quartus’ version).
- Create a new file called 51-usbblaster.rules as root. The path should be
/etc/udev/rules.d/51-usbblaster.rules
Store information about FTDI JTAG. For example, if your JTAG is FTDI 2232, then type the below inside 51-usbblaster.rules . See Figure 1 and Figure 2 for more information.
SUBSYSTEM == "usb", ENV {DEVTYPE} == "usb_device", ATTR {idVendor} == "0403", ATTR {idProduct} == "6010", MODE = "0666"
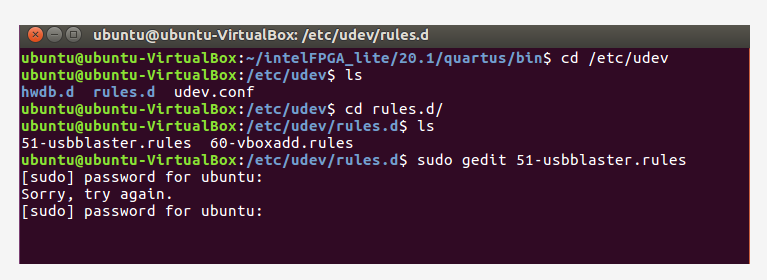
Figure 1 Create 51-usbblaster.rules as root
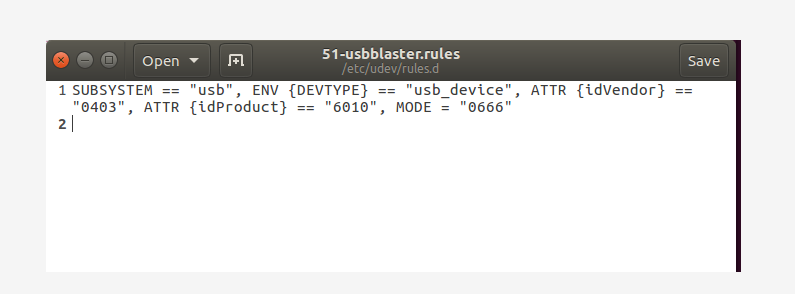
Figure 2 51-usbblaster.rules
- Connect the FII-PRA006 FPGA board with your PC.
- Type
$ lsusb
check whether it detects ID 0403: 6010 device
- Ubuntu Linux would regard FTDI devices as serial ports by default, so FTDI channel 0 and FTDI channel 1 should be separated. According to the schematics, FTDI channel 0 is the JTAG, while FTDI channel 1 is the serial port, which means FTDI channel 0 should be unbound from serial port without affecting FTDI channel 1’s serial port binding. The steps are as follows:
- Type
$ sudo dmesg | grep -i ftdi_sio
to get FTDI driver information
-
- In Figure 3, 1-3:1.0 is the FTDI channel 0, and the 1-3:1.1 is the FTDI channel 1.

Figure 3 FTDI driver information
-
- Follow the below steps to switch to the root user.
-
-
- Type
-
$ su root
make sure your password is correct, then you can switch to root account. If root user has not been set up yet, type $ sudo passwd root to set, as shown in Figure 4.

Figure 4 Set up root user password
-
- Under root user, according to FTDI channel 0 driver ID 1-3:1.0 ( see the above Figure 3 ), type
# echo -n “1-3:1.0” > /sys/bus/usb/drivers/ftdi_sio/unbind
to unbind FTDI channel 0 and serial driver, as shown in Figure 5.

Figure 5 Unbind FTDI channel 0 and serial driver
-
- Retype
$ sudo dmesg | grep -i ftdi_sio
to recheck the JTAG driver information. As shown in Figure 6, ttyUSB0 (FTDI channel 0) are disconnected.

Figure 6 FTDI channel 0 is disconnected with ttyUSB0/ serial driver
- Kill the built-in Intel JTAG daemon.
$ sudo killall -9 jtagd

$ sudo ./jtagd --user-start --config /home/dev/.jtagd.conf
- After finished all the steps above, check with typing
$./jtagconfig
MBFTDI-Blaster (JTAG) pops up, as shown in Figure 7.
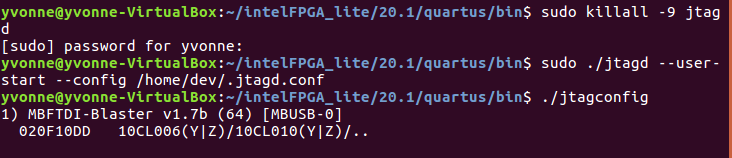
Figure 7 Detect MBFTDI-Blaster
Attention: all the steps should be repeated every time after your PC powers off or JTAG is disconnected.
Reference: