Related reference articles:
RISC-V teaching plan
Freedom Studio download project file
- target board connection
- First, remove any other USB devices from your computer except the keyboard and mouse
- On the target board, select the target board power-on mode as jumper connection: USB_5V– PWR_5V, as shown in Figure 1
- Use the USB cable to connect the computer to the CPU_JTAG interface of the target board
- Press the power button PB8 to power on the target board

Figure 1 Target board power selection
- Install the USB driver, as shown in Figure 2
- Run the zadig-2.4.exe software
- Select List All Devices in Options
- Select Digilent USB Device (Interface 1) in the drop-down menu
- Click Reinstall Driver
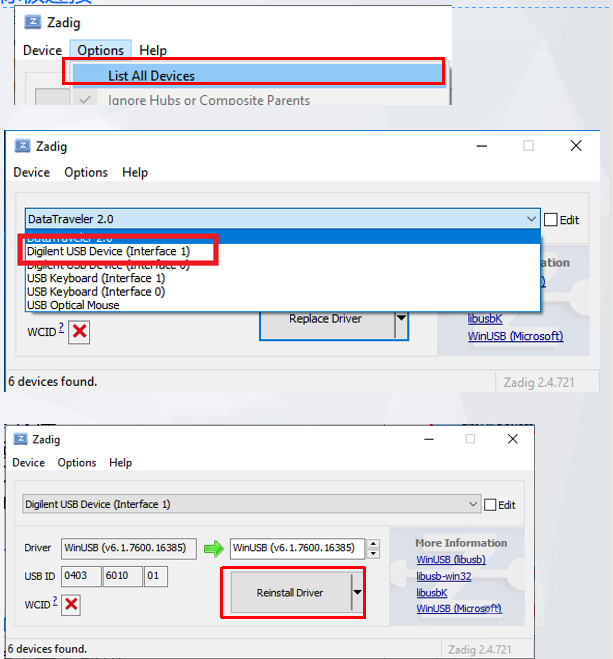
Figure 2 Driver installation

Figure 3 Driver installation is successful
-
- The prompt shown in Figure 3 appears, indicating that the installation is successful
- close zadig software
- Reconnect other computer USB devices to the computer
- Engineering download
The project download includes two parts: FPGA programming and RISC-V software download.
-
- FPGA programming ( for more detailed FPGA programming information, see the article: FII-PRX100-D development board FPGA programming and RISC-V software code download, but note that JTAG is used here, and the V2.02 version and above must be configured RISC-V CPU ):
- First make sure the CPU_JTAG USB port (on the target board) is connected to the computer
- Open the Vivado software and open any project
- Click Open Target -> Auto Connect to connect the JTAG interface, as shown in Figure 4
- FPGA programming ( for more detailed FPGA programming information, see the article: FII-PRX100-D development board FPGA programming and RISC-V software code download, but note that JTAG is used here, and the V2.02 version and above must be configured RISC-V CPU ):

Figure 4 Connecting the FPGA
-
-
- Right-click the mt25ql128 FLASH device, click Program Configuration Memory Device…
- Select the file FII_RISCV_V2.mcs to be burned, as shown in Figure 5
-

Figure 5 FPGA programming
-
-
- Click OK and wait for the burn to complete, as shown in Figure 6
- Press the reset button on the target board to restart the FPGA. So far the FPGA programming is complete
-

Figure 6 Burn mcs file
-
-
- After the FPGA programming is completed, the development board is shown in Figure 7
-

Figure 7 FPGA running RISC-V demonstration
-
- software download:
- Right-click on the run_led project and select: Debug As ->Debug Configuration to open the Debug Configuration window, as shown in Figure 8
- software download:

Figure 8 Debug Configuration
-
-
- Create a new launch configuration :
- Click to select GDB OpenOCD Debugging , click the ‘New’ icon in the upper left corner to create a new programming configuration, as shown in Figure 9
-

Figure 9 New GDB OpenOCD Debugging
-
-
- Name the new debug setting run_led Debug
- Add run_led.elf file path
- After setting, click Apply , as shown in Figure 10
-

Figure 10 GDB OpenOCD Debugging settings
-
-
- Set Debugger options
- Add -f test_dbg.cfg in the config options column , and add set mem inaccessible-by-default off in Commands , as shown in Figure 11
- After setting, click Apply
-

Figure 11 GDB OpenOCD Debugging Debugger settings
-
-
- Set the Startup option, pay attention to check Set Program counter at (hex), and enter 80000000, as shown in Figure 12
- After setting, click Apply
-

Figure 12 GDB OpenOCD Debugging Startup settings
-
-
- Click Debug to burn the software, as shown in Figure 13
-

Figure 13 Software burning
Note: If the error dialog box shown in Figure 14 pops up during the first download, check Always launch without asking and click Proceed to download normally
If a confirmation dialog box pops up to open the SiFive window, select Remember my decision and click Yes to confirm
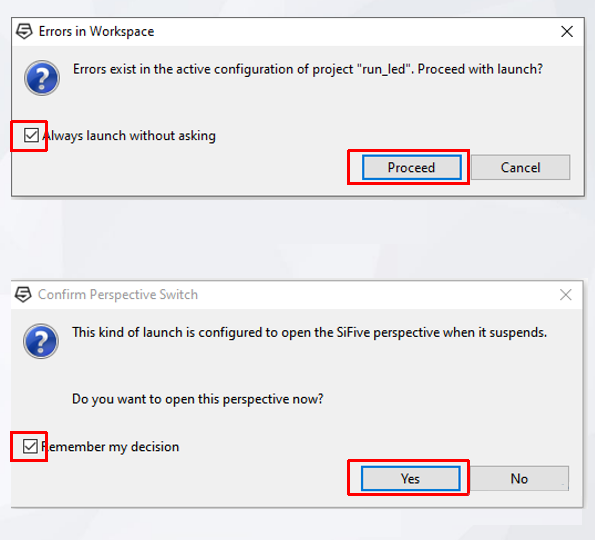
Figure 14 Pop-up dialog box
-
-
- See the console window as shown in Figure 15, it proves that the download is successful
-

Figure 15 Software download is successful
-
- After the download is over, if you see a marquee, as shown in the video below. Prove that the project is downloaded successfully
Figure 16 Demonstration of the marquee program
- If the download fails, it is recommended to check whether the Debug related settings are consistent with the example
- If you need to re-download, you should first click the Terminate button in the toolbar to terminate the program running, and then click the Debug button to recompile after the program stops running, as shown in Figure 17
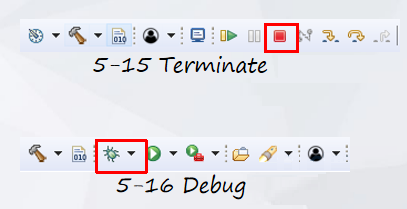
Figure 17 Shortcut keys