This article talks about how to use GPIO to control the LED lights on the development board, and how to incorporate the buttons into the mix.
If you wish to view the official documentation and examples, you can visit the official page.
For related subjects, please refer to the SOC Table of Contents.
Output
If we want to control GPIO from the user space and Shell, we will first need to go into the gpio directory.
cd /sys/class/gpio
Using the ls command to see its contents would yield something called gpiochip. Note that our Zynq GPIO has its initial 54 GPIO pins reserved for MIO, and the pins after 54 are for EMIO. We should also note that the first Zynq pin starts at 906, and ends at 1023. Because we will be using EMIO, we will add 54 to the displayed pin, which is gpiochip906. This makes 960 the starting pin for the starting LED.
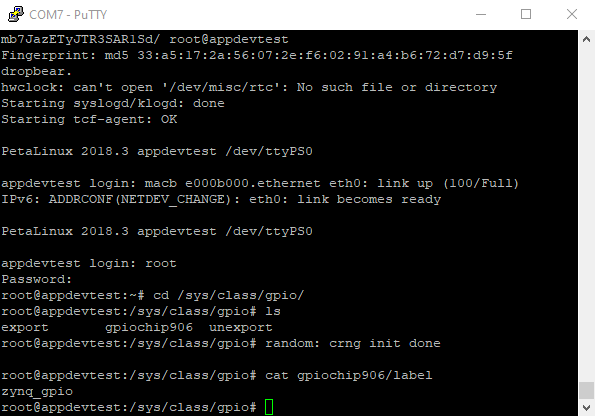
Next we will demonstrate how to export a GPIO pin, read the pin’s direction and value, and set the direction to output as well as value to 1.
The command to export the pin is as follows. Note that you can use any PIN number between 960 and 967 because they each correspond to one of the 8 LEDs on the development board.
echo 960 > /sys/class/gpio/export
If you want to see all the subdirectories, you can use the following command:
ls /sys/class/gpio/gpio960/

We will then use the following command to change the direction to output.
echo out > /sys/class/gpio/gpio960/direction
We will use the following command to modify the value of value. Because we wish to turn on the LED, we will set it to have the value of 1.
echo 1 > /sys/class/gpio/gpio960/value
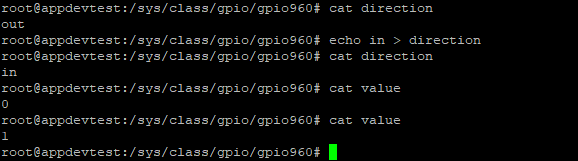
If we want to look at the current value of direction or value, we can use the cat command.
cat /sys/class/gpio/gpio960/direction
cat /sys/class/gpio/gpio960/value
If you already used cd to go into the /sys/class/gpio/gpio960/ directory, you’ll only need to execute cat direction and cat value.
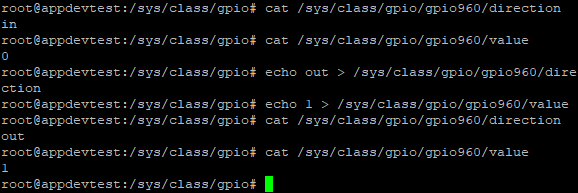
We can see that the direction has been set as out, and then value has been set to 1. If we look at the development board, we can see that a LED has now been lit.
We will now utilize the above information to create a simple LED application.
The code can be downloaded here.
The code is as follows:
#include <stdio.h>
#include <stdlib.h>
#include <fcntl.h>
#include <unistd.h>
#include <string.h>

int main()
{
    int valuefd, exportfd, directionfd;

    printf("GPIO test running...\n");

    // The GPIO has to be exported to be able to see it
    // in sysfs
    while (1){
    exportfd = open("/sys/class/gpio/export", O_WRONLY);
    if (exportfd < 0)
    {
        printf("Cannot open GPIO to export it\n");
        exit(1);
    }

    // Determine Entered GPIO
    char lednum[2];
    printf("Enter the light you want to turn on/off (1-8): ");
    scanf("%s", &lednum);

    int gpiocount = 959 + atoi(lednum);    // atoi converts string to int

    //printf("int value of gpiocount is: %d\n", gpiocount);

    char writegpio[4];
    sprintf(writegpio, "%d", gpiocount);    // sprintf converts int to string

    write(exportfd, writegpio, 4);
    close(exportfd);

    printf("GPIO exported successfully\n");

    // Update the direction of the GPIO to be an output

    char defaddress[23] = "/sys/class/gpio/gpio";    // create address base
    strcat(defaddress, writegpio);    // creates address for the specified GPIO

    char directionaddress[33] = "";
    strcat(directionaddress, defaddress);    // increase address size for address

    char direction[] = "/direction";
    strcat(directionaddress, direction);    // create direction address

    directionfd = open(directionaddress, O_RDWR);
    if (directionfd < 0)
    {
        printf("Cannot open GPIO direction it\n");
        exit(1);
    }

    write(directionfd, "out", 4);    // set direction as out
    close(directionfd);

    printf("GPIO direction set as output successfully\n");

    // Get the GPIO value ready to be turned on/off

    char valueaddress[29] = "";
    strcat(valueaddress, defaddress);    // increase address size for value

    char value[] = "/value";
    strcat(valueaddress, value);    // create value address

    valuefd = open(valueaddress, O_RDWR);
    if (valuefd < 0)
    {
        printf("Cannot open GPIO value\n");
        exit(1);
    }

    printf("GPIO value opened\n");
    // toggle the GPIO

    char ledvalue;
    printf("Turn on or off? (0/1): ");
    scanf("%d", &ledvalue);

    if (ledvalue == 1){
        write(valuefd,"1", 2);
        printf("value set to 1\n");
    }
    else if (ledvalue == 0){
        write(valuefd,"0", 2);
        printf("value set to 0\n");
    }
    else{
        printf("invalid value\n");
        }
    }
    return 0;
}
After completion, we can use PetaLinux to compile the code and use RCP to transfer it to the development board.
The code for compilation and exporting a .o file is as follows. Note that you should change it accordingly to match your specific case.
arm-linux-gnueabihf-gcc input_app.c -o input_test_app.o
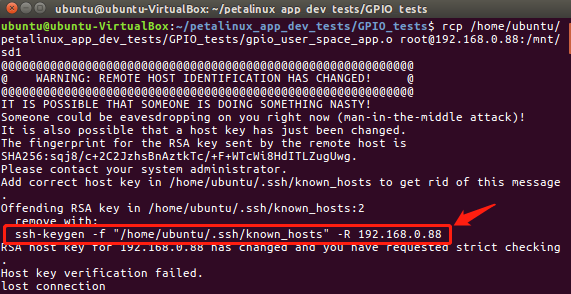
The code for RCP transfer is as follows. Please change accordingly and use the development board’s IP address. The username and password should both be “root”.
rcp /home/ubuntu/petalinux_app_dev_tests/GPIO_tests/input_test_app.o root@192.168.0.88:/mnt/sd1
Note that you should have already mounted the SD card prior to executing the commands. In my case, I created the sd1 folder under /mnt, and mounted the first partition to it.

If you get a key error for RCP, it can be resolved simply be entering the code that it provides.
The app/program can then be executed upon successful transfer.
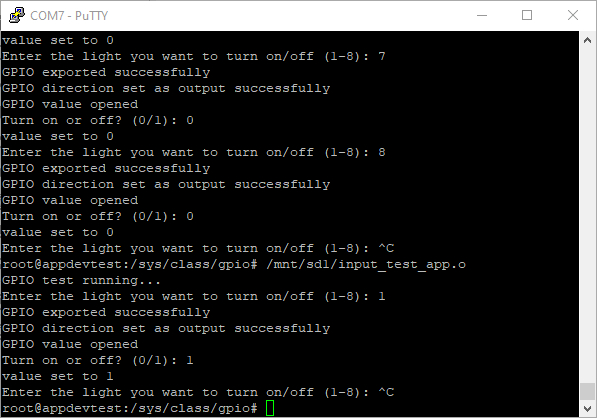
One only needs to find and execute the file. While running, you can specify one of the 8 LEDs, and choose to turn it on or off.
Because the entire program is in a infinite loop, pressing [Ctrl] + c will quit the program.
Input
If we look at the switches next to each LED, we can use them to test the input commands.
First, we will use the cat command to see if the current direction value is input or output. If it is set as output, you will discover that flipping the switch has no effect on the LED.
If we set it to input, we can see that flipping the switch on and off will also turn the LED on and off. If we use cat to view the value when the LED is off, we can see that it is 0; when the LED is on, we can see that it is 1.
Next, we can turn to the 7 push-buttons next to the LEDs.
If we look at the kernel’s TOP.v file, we can see the following 2 lines.
assign led = GPIO_EMIO_tri_io[7:0];

assign key_but = GPIO_EMIO_tri_io[14:8];
This means that the 0 to 7 after 960 is assigned to the LEDs, and that the 8 to 14 after 960 is assigned to the push-buttons. The order is from left to right, from top to bottom.
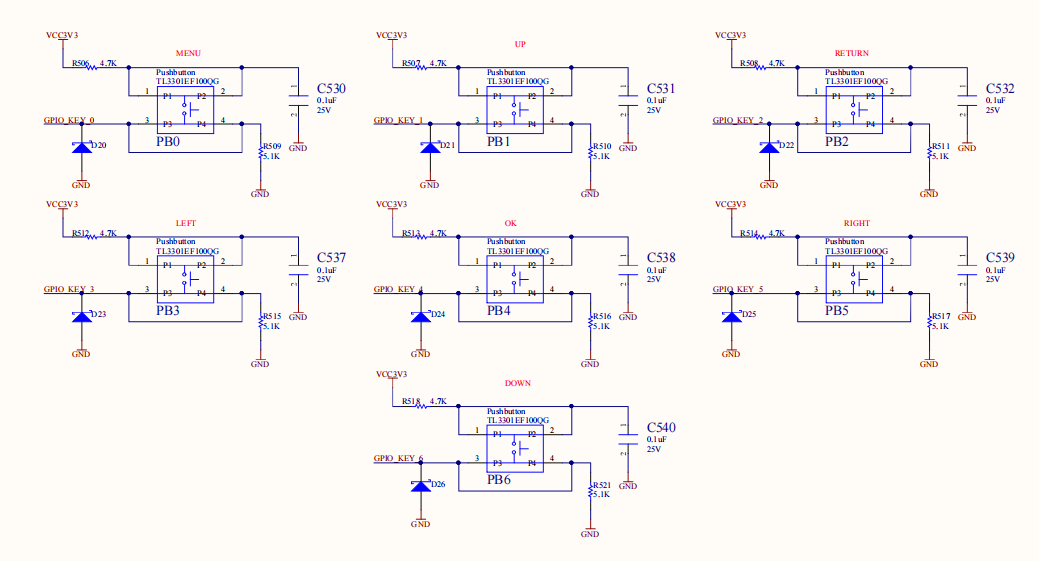
Like in the previous section, we will first export the pins. If we choose to use the first button, which is the top left in the diagram, then the corresponding pin is 968.
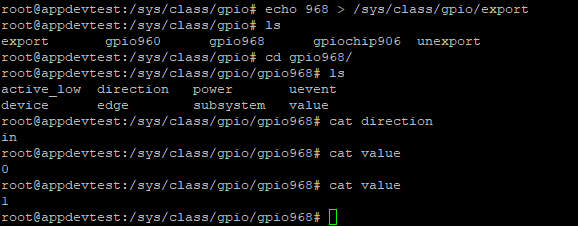
Under the gpio directory we will execute the following command.
echo 968 > /sys/class/gpio/export
If we use the ls command we can see that we successfully exported the pin. Next, we will use cd to go into the directory.
Use the cat command to verify that the direction is set as input. Make sure you change it if you see that it is set to output.
After changing it to input, you can see that value is 0 because it hasn’t been pressed.
If we use cat to see value while the button is pressed, we can see that the value is now 1.
We can write an app/program based on the above information, where pressing a button would light up a corresponding LED.
The code can be downloaded here.
The code is as follows:
#include <stdio.h>
#include <stdlib.h>
#include <fcntl.h>
#include <unistd.h>
#include <string.h>

int main()
{
    int valuefd, exportfd, directionfd, ledfd;

    printf("GPIO test running...\n");

    // The GPIO has to be exported to be able to see it
    // in sysfs

    while (1){

        for (int a = 960; a <= 974; a++){

            exportfd = open("/sys/class/gpio/export", O_WRONLY);
            if (exportfd < 0)
            {
                printf("Cannot open GPIO to export it\n");
                exit(1);
            }

            char pin[4];
            sprintf(pin, "%d", a);
            write(exportfd, pin, 4);
            close(exportfd);

        }

        for (int i = 968; i <= 974; i++){
            exportfd = open("/sys/class/gpio/export", O_WRONLY);
            if (exportfd < 0)
            {
                printf("Cannot open GPIO to export it\n");
                exit(1);
            }

            char pin[4];
            sprintf(pin, "%d", i);
            write(exportfd, pin, 4);
            close(exportfd);

            char address[30] = "/sys/class/gpio/gpio";
            strcat(address, pin);
            strcat(address, "/value");
            valuefd = open(address, O_RDWR);
            if (valuefd < 0)
            {
                printf("Cannot open GPIO value\n");
                exit(1);
            }

            lseek(valuefd, 0, SEEK_SET);
            char readvalue[2];
            read(valuefd, readvalue, 2);
            int intvalue = atoi(readvalue);


            // For the LED
            char pin2[4];
            sprintf(pin2, "%d", i - 7);
            char address2[30] = "/sys/class/gpio/gpio";
            strcat(address2, pin2);
            strcat(address2, "/value");

            char address3[34] = "/sys/class/gpio/gpio";
            strcat(address3, pin2);
            strcat(address3, "/direction");

            directionfd = open(address3, O_RDWR);
            if (directionfd < 0)
            {
                printf("Cannot open GPIO direction it\n");
                exit(1);
            }

            write(directionfd, "out", 4);
            close(directionfd);

            ledfd = open(address2, O_RDWR);

            if (ledfd < 0)
            {
                printf("Cannot open led GPIO value\n");
                exit(1);
            }

            if(intvalue == 1){
                char test1[2];
                char test2[2];

                lseek(ledfd, 0, SEEK_SET);
                write(ledfd, "1", 2);
            }

            close(valuefd);
            close(ledfd);
        }

    }
    return 0;
}
Because it is a infinite loop, pressing [Ctrl] + c will quit the program.